
Want scroll-stopping photos at Hathi Gaon (Elephant Village) without gimmicks or stress? This published-ready guide gives you exact shot ideas, where to stand, when to arrive, what gear/settings to use, and the etiquette that keeps everyone safe and comfortable—elephants included. Whether you’re on a phone or a full-frame camera, you’ll walk in with a plan and walk out with a gallery.
Quick Snapshot (2025)
- Best light: The last 60–90 minutes before sunset (classic golden hour). Arrive earlier to scout angles.
- Most versatile spot: Reservoir edges for reflections/silhouettes, plus nearby shaded paths for backlit dust.
- Lenses that win: 24–70mm (all-rounder), 70–200mm (compressed silhouettes), 35mm/50mm (storytelling).
- Phone shooters: Shoot 0.5× ultra-wide for scenery, 1×/2× for portraits, lock exposure, and enable HDR.
- Etiquette: Hands-off by default, keep distance, no flash close-up, never block an elephant’s path.
What Makes Hathi Gaon Photogenic (So You Can Plan Like a Pro)
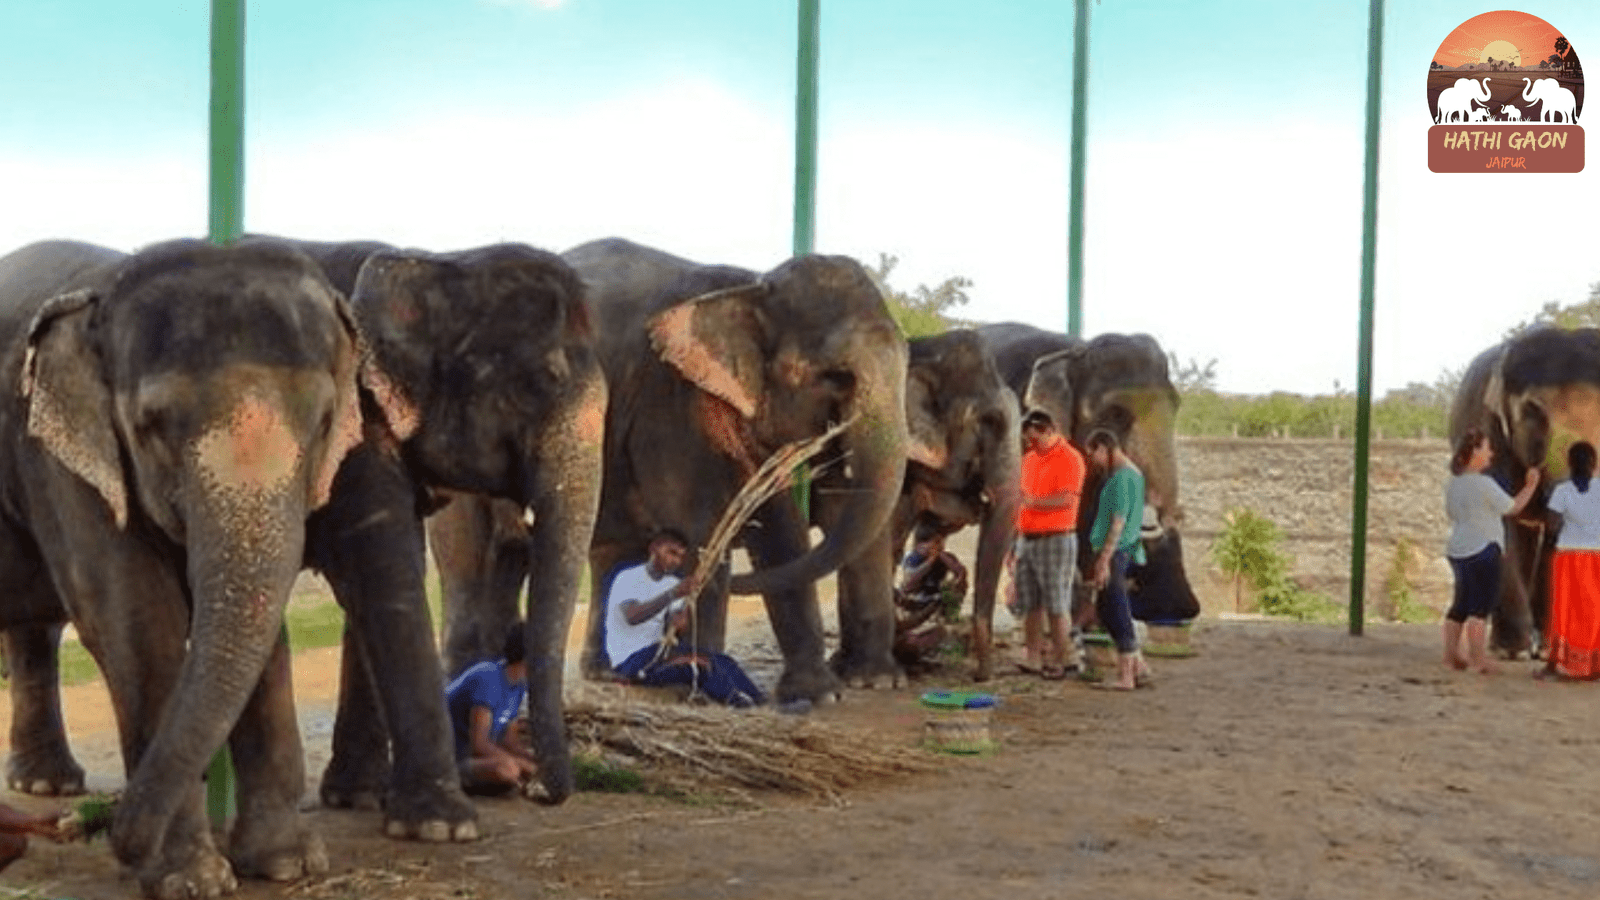
Hathi Gaon blends open sky, water, textured earth, and soft foliage—a perfect backdrop for silhouettes, reflections, and wide environmental portraits. Because the village is active and living, the most compelling frames come from observing quietly and anticipating moments: dusting, walking, drinking, trunk reaches, and candid mahout interactions (photograph people only with consent).
Creative anchors to look for:
- Leading lines: Footpaths, water edges, and low fences guide the eye.
- Foreground frames: Leaves, posts, or soft bokeh to layer depth.
- Juxtaposition: Grand animal forms against minimal sky or water.
- Negative space: Leave room above silhouettes for a calmer, premium look.
Where to Shoot: On-Ground Vantage Points
Always follow staff guidance; keep speed low near final approach; stay on marked paths.
1. Reservoir Edge (the Reflection Classic)
-
- What you get: Mirror-like reflections near sunset, pastel skies, long shadows.
- How to shoot: Angle yourself diagonal to the water to avoid shooting your own silhouette into the frame; keep your feet clear of wet patches.
- Best focal lengths: 24–70mm for scene setting; 70–200mm for tight, compressed silhouettes.
2. Shaded Path with Backlight (Dust Glow)
-
- What you get: Backlit dust sparkles, rim light on ears and trunk, great separation.
- How to shoot: Set exposure for the highlights (slightly underexpose). Time your frames when dust lifts or sun grazes foliage.
- Best focal lengths: 35mm/50mm for storytelling; 85–135mm for portraits at a respectful distance.
3. Open Ground with Side Light (Minimalist Silhouettes)
-
- What you get: Clean horizons, sculpted shapes.
- How to shoot: Go low to simplify backgrounds; keep the subject separated from trees/buildings to avoid “merging” edges.
4. Distant Ridge/Tree Line (Scale & Context)
-
- What you get: Small subject against a large environment—“subject-as-accent” style.
- How to shoot: Use 70–200mm or crop later; wait for a stride moment (raised front leg gives life).
Timing: The 90-Minute Plan
- T-90 min: Arrive, hydrate, and walk the area. Mark two primary angles (Plan A & B) plus a safe backup.
- T-60 min: Set base exposure; take test shots at each spot; decide first composition.
- T-45 min: Begin with backlit dust frames (sun still higher).
- T-25 min: Move to the reservoir for reflections as light softens.
- T-10 min → Sunset: Lock in silhouettes and minimal scenes; expose for sky, not subject.
- Blue hour (optional): One last wide shot with cool tones and clean lines.
Gear & Settings (Phone + Camera)
Phone Photography (iPhone/Android)
- Lenses:
- 0.5× ultra-wide for scene and sky.
- 1×/2× for portraits; avoid extreme digital zoom.
- Exposure: Long-press to lock focus/exposure (AE/AF Lock), then slide to slightly underexpose for rich skies.
- HDR: Keep on for high-contrast scenes; turn off if it creates halos around silhouettes.
- Live/Burst: Use burst for motion; select the cleanest stride moment.
- Stability: Brace elbows to ribs; use a small grip or mini-tripod if you carry one.
- Editing (mobile): Lift shadows sparingly, reduce highlights, add a touch of warmth at golden hour and clarity/structure carefully.
Mirrorless/DSLR
- Essential lenses:
- 24–70mm: Everything from context to mid-portraits.
- 70–200mm: Compressed silhouettes and safe-distance portraits.
- 35/50mm fast primes: Low-light and storytelling.
- Baseline settings (golden hour):
- Aperture: f/2.8–f/4 for portraits; f/5.6–f/8 for silhouettes and reflections.
- Shutter: 1/500–1/1000 for movement; slower if still scenes.
- ISO: Start low (100–400), raise as light falls.
- AF mode: Continuous/AI-Servo for moving subjects.
- Metering: Spot/center-weighted for highlights; dial –0.3 to –1.0 EV for sky detail.
- RAW + JPEG: Shoot both. RAW for latitude; JPEG for instant sharing.
- Filters:
- CPL to tame glare on water (rotate gently; don’t overdo).
- Soft GND if you carry one—helps hold sky and land together.
Composition Playbook (Copy These)
- Classic Silhouette Walk
- Side-on stride, trunk gently curved. Sky exposed; subject goes dark.
- Leave negative space above for a premium, editorial look.
- Mirror Double
- Position near still water; shoot low so the subject and its reflection fill the vertical frame.
- Slightly underexpose; straighten horizon in post.
- Backlit Dust Halo
- Place the sun behind the subject; wait for dust to plume.
- Keep shutter at 1/800+; try f/4–f/5.6 for a crisp subject edge.
- Mahout Micro-Story
- With consent, capture a candid exchange or quiet pause at a respectful distance.
- Keep hands-off; if a person looks toward the lens, acknowledge and smile—nonverbal consent matters, but always ask before closer portraits.
- Scale vs. Sky
- Tiny subject near horizon; big sky gradients.
- Minimal color grading; let the gradient carry the mood.
Ethical & Safety Etiquette (Non-Negotiables)
- Hands-off by default. Any contact must be brief, supervised, and essential—not a prop.
- Distance = respect. Use longer lenses for close-looking shots.
- No flash near faces. Sudden light can startle; keep strobes packed.
- Never block a path. If an elephant changes direction, you move first.
- Quiet on set. Lower voices, slow movements, no crowding.
- Food rules: Only what staff provide/approve, in small, supervised amounts.
- People-first consent: Ask before photographing mahouts or staff; offer to share the images.
Seasonal Looks (So Your Gallery Feels Different)
- Winter (Nov–Feb): Crisp air, long shadows, pastel sunsets. Great for clean silhouettes and neutral edits.
- Summer (Mar–Jun): Warm tones and heat haze; shoot later and embrace gold in your color grade.
- Monsoon (Jul–Sep): Greens pop; go for reflections, muted contrast, and moodier frames.
- Shoulders (Oct & late Feb–Mar): Stable weather and softer crowds; experiment with storytelling sequences.
Smart Workflow (Before, During, After)
Before
- Charge batteries/power bank, clear cards, update time on both camera and phone.
- Pack: microfiber cloth, CPL filter, small towel/wipes, rain cover (monsoon), light jacket (winter).
During
- Start wide for context → move to mid and tele for details.
- Shoot small sequences (3–5 images) that tell a mini story.
After
- Back up immediately: card → phone/tablet → cloud/drive.
- Basic edit recipe:
- White balance: Slightly warm at golden hour.
- Exposure: Hold highlights; lift shadows gently.
- Contrast/Dehaze: Touch only; silhouettes don’t need heavy clarity.
- Crop: Keep horizons straight; mind edge merges (ears/trunks).
Reels & Short Video Ideas (Trendy but Respectful)
- “Walk to Wonder” (6–8 cuts): Arrival → dusty backlight → reflection reveal → silhouette closing shot.
- “Tools of Care” Macro: With consent, detail shots of water filling, foot checks, fodder stacking (hands-only framing).
- “Light Chase” POV: Feet walking → sun flare through leaves → reservoir reflection → fade-out with ambient sound.
Audio tip: Capture a few seconds of ambient village sound for an authentic bed under music.
Alt Text & Captions (SEO + Accessibility)
Alt text examples:
- “Backlit elephant walking along reservoir edge at sunset in Hathi Gaon, Jaipur.”
- “Elephant silhouette with golden reflections over calm water in Hathi Gaon.”
- “Mahout standing beside elephant at a distance under soft evening light at Elephant Village Jaipur.”
Caption starters:
- “Hands-off, golden light, and room to breathe—Hathi Gaon at its calmest.”
- “Reflections at sunset > any filter.”
- “We watched quietly; the photos did the talking.”
Packing Checklist (Copy-Paste)
- Camera/phone, extra battery/power bank, memory cards
- 24–70mm and/or 70–200mm (creators), CPL filter
- Closed shoes, hat/cap, sunscreen, water
- Microfiber cloth, small towel, rain cover (monsoon), light layer (winter)
- Snack for yourself; follow staff for any animal feeding rules
Common Mistakes (Easy Fixes)
- Shooting too bright: Underexpose –0.3 to –1.0 EV for skies.
- Standing too close: Step back; use longer lenses for intimacy without intrusion.
- Flat horizons: Kneel or go low for cleaner separations.
- Rushing spots: Scout first, then commit to two angles you can perfect.
- Over-editing: Keep color natural; let light do the heavy lifting.
Sample 90-Minute Creator Itinerary
- 00:00–00:15 Arrival + scout (note wind direction for dust, check reflections).
- 00:15–00:40 Backlit path sequences (wide → mid → tele).
- 00:40–01:05 Shift to reservoir for reflection tests; adjust CPL if needed.
- 01:05–01:30 Sunset silhouettes, minimal compositions; two hero frames locked in.
FAQs (2025)
1) Is a telephoto necessary?
No, but 70–200mm gives you respectful distance and cinematic compression. Phones still win with timing and clean angles.
2) Can I use a drone?
Avoid unless you have explicit written permission and trained supervision. Sound and proximity can disturb animals.
3) What if it’s cloudy?
Great—diffused light is perfect for portraits and storytelling. Focus on reflections, details, and Q&A moments with staff (with consent).
4) Can I do night shots?
Stick to daylight/golden hour. Night adds safety complications and rarely improves the story here.
5) Are props okay?
Skip props that cause stress or crowding. Let natural behavior lead your frames.
Final Word
The best Hathi Gaon photos come from patience, distance, and timing—not tricks. Arrive early, pick two smart vantage points, underexpose for sky drama, and keep interactions hands-off and supervised. Do less, but do it beautifully. Your gallery—and the animals—will thank you.


)
No comment